1.pastikan file Portal_for_ArcGIS_Linux_114_192978.tar.gz sudah ada di /home/geonet/Documnets
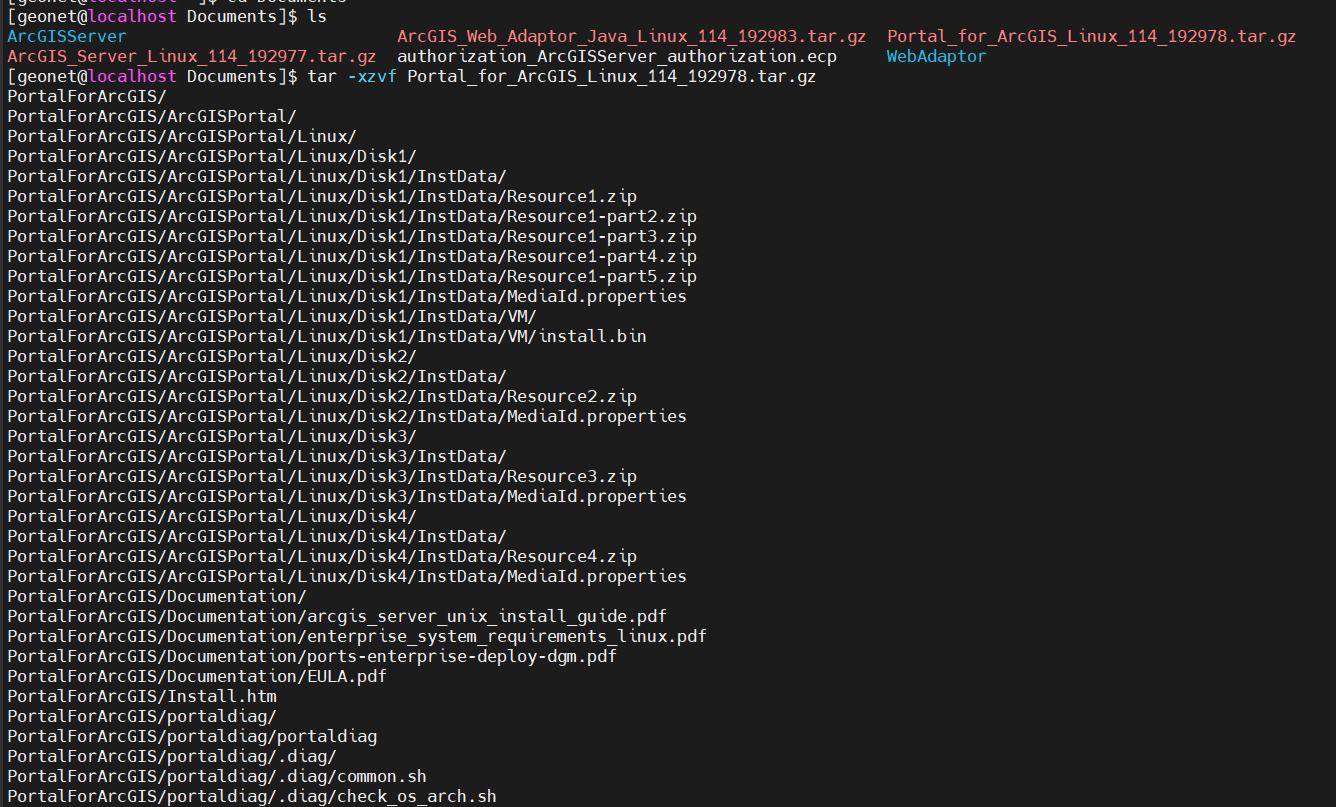
2.extract file instalasi Portal_for_ArcGIS. pastikan masuk sebagai user geonet.masuk ke /home/geonet/Documents
masukan command berikut untuk extract
tar -xzvf Portal_for_ArcGIS_Linux_114_192978.tar.gz
3.jika sudah terextract dengan benar pada direktori documents akan ada PortalForArcGIS,cd PortalForArcGIS lalu jalankan ./Setup.sh dan proses instalasi akan berjalan.
4.proses instalasi
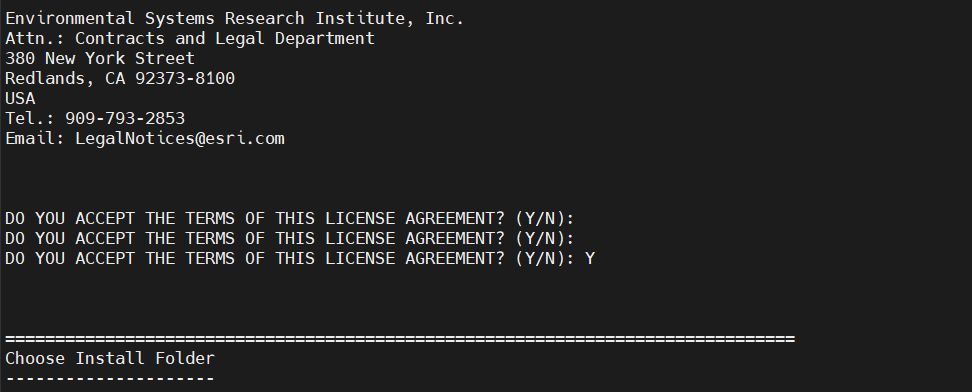
pilih Y untuk menyetujui agreement
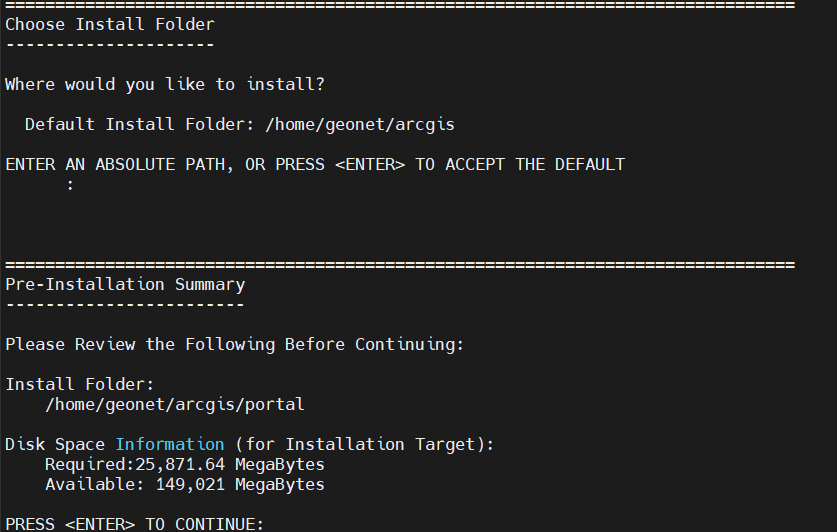
pada instalation path bairkan default
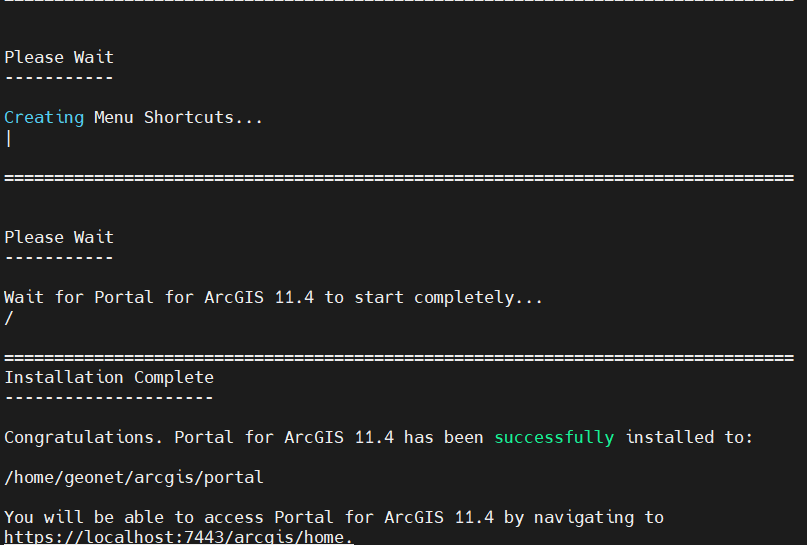
instalasi selesai dan kita diarahkan untuk mengakses portal https://lcoalhost:7443/arcgis/home unutk melakukan config lanjutan
5.sebelum membuka portal,ubah dan copy arcgis.war menjadi portal.war.
masuk ke direktoricd /opt/tomcat/arcgis/webadaptor11.4/java/
input command
sudo cp arcgis.war /opt/tomcat/webapps/portal.war
pastikan portal.war sudah ada di /opt/tomcat/webapps/
input command sudo chown -R tomcat:tomcat portal.war agar portal.war dapat diekseskusi oleh tomcat
6.create new portal
masuk ke https://localhost:7443/arcgis/home lalu pilih create new portal
select license.json,pastikan sudah ada file license untuk ArcGIS Portal. file license terdapat di /home/geonet/documents. klik browse dan pilih license yg sudaha ada
membuat account untuk administrator & additional account
configuration summary,lalu klik create untuk melanjutkan proses create
8.setup portal for arcgis
setelah account unutk portal berhasil di created masuk ke https://localhost/portal/webdaptor/ pilih portal for arcgis
9.config portal webadaptor
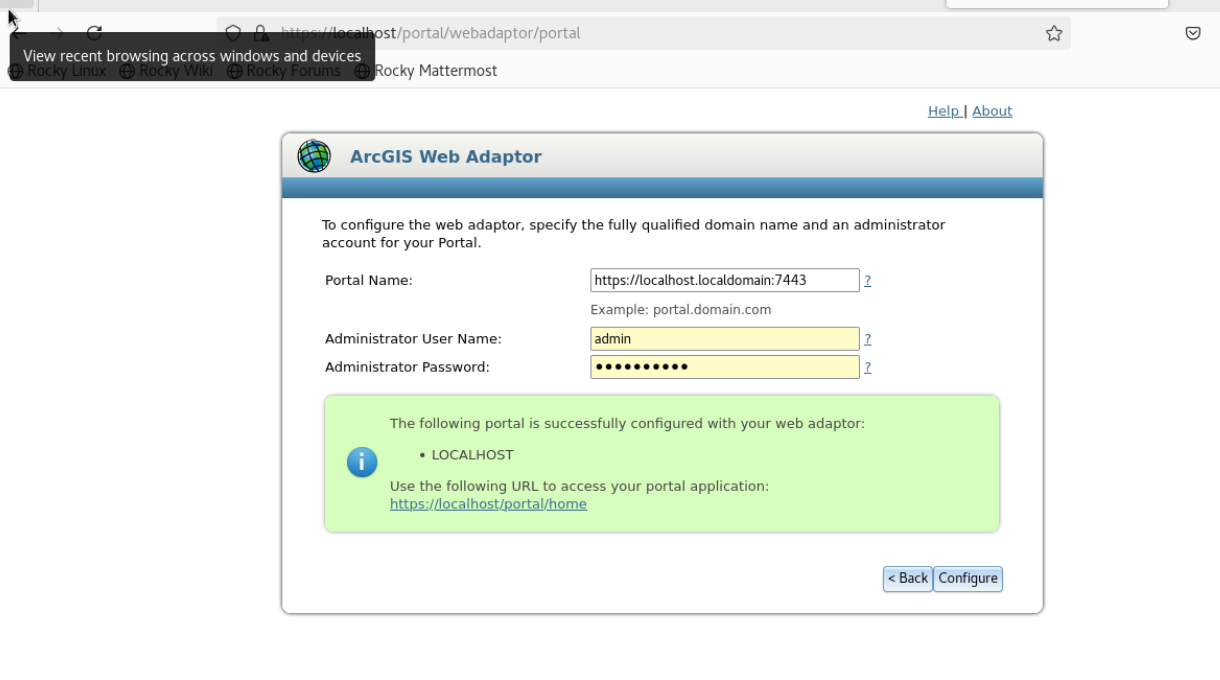
jika config yang dilakukan banar,portal webadaptor akan terbuka dan akan meminta portal name,admin username dan password
input
https://localhost:7443/
10.config portal webadaptor via command line
config melalui command line denganconfigurewebadaptor.sh masuk kecd /homne/geonet/arcgis/webadaptor11.4/java/tools
saat terjadi error pada proses configure masuk ke:
cd /arcgis/portal/usr/arcgisportal/logs/local/portal
kemudian:
ls -ltr
lihat log file secara real time
tail -f portal-20250827.085821-153868-0.0.log
dari log file tsb kita bisa melihat error yang terjadi serta perhatikan webadaptor name dan credential.
11.tampilan akhir portal
Post Instalation
service lifecycle management
masuk ke file instalasi arcgisportal cd /home/geonet/arcgis/portal/framework/etc/arcgisportal.servicepastikan ada arcgisportal.service
copy file arcgisportal.service ke /etc/systemd/system/
copy command:
sudo cp arcgisportal.service /etc/systemd/system/
ubah permission arcgisportal.service yang sudah tersimpan pada /etc/systemd/system. pastikan permissionya menjadi rw------- agar dapt dieksekusi
chmod 600 arcgisportal.service
untuk membuat links otomatis di dalam /etc/systemd/system/multi-user.target.wants jalankan command di bawah ini:
systemctl enable arcgisportal.service
Dengan menambahkan /bin/bash di depan perintah, Anda secara eksplisit memberitahu systemd untuk menggunakan interpreter Bash untuk menjalankan skrip Anda. Hal ini penting jika skrip Anda tidak memiliki shebang (#!/bin/bash) atau tidak memiliki izin untuk dijalankan secara langsung (tidak executable).
[Unit]
Description=Portal for ArcGIS Service
After=network.target

[Service]
Type=forking
User=geonet
GuessMainPID=false
LimitNOFILE=65535
Restart=on-failure
# To prevent any one service from spawning too many threads and consuming all
# server resources, systemd v228 and beyond included in SLES12 SP2 and higher
# set the maximum number of threads to be created at 512.  Users on SLES12 may
# need to enable and raise this limit if it is a heavily used system.  Use
# "systemctl show --property DefaultTasksMax" to check the current value.   To
# find the version of systemd, use "systemctl --version".
# TasksMax=512

ExecStart=/bin/bash /home/geonet/arcgis/portal/startportal.sh
ExecStop=/bin/bash /home/geonet/arcgis/portal/stopportal.sh

[Install]
WantedBy=multi-user.target
untuk memastikan servide systemd berjalan jalankan command berikut:
systemctl stop arcgisportal.service
systemctl start arcgisportal.service
systemctl start arcgisportal.service
service management pada arcgis portal berhasil berjalan
# Install & Config ArcGIS Portal
## 1.pastikan file Portal_for_ArcGIS_Linux_114_192978.tar.gz sudah ada di /home/geonet/Documnets
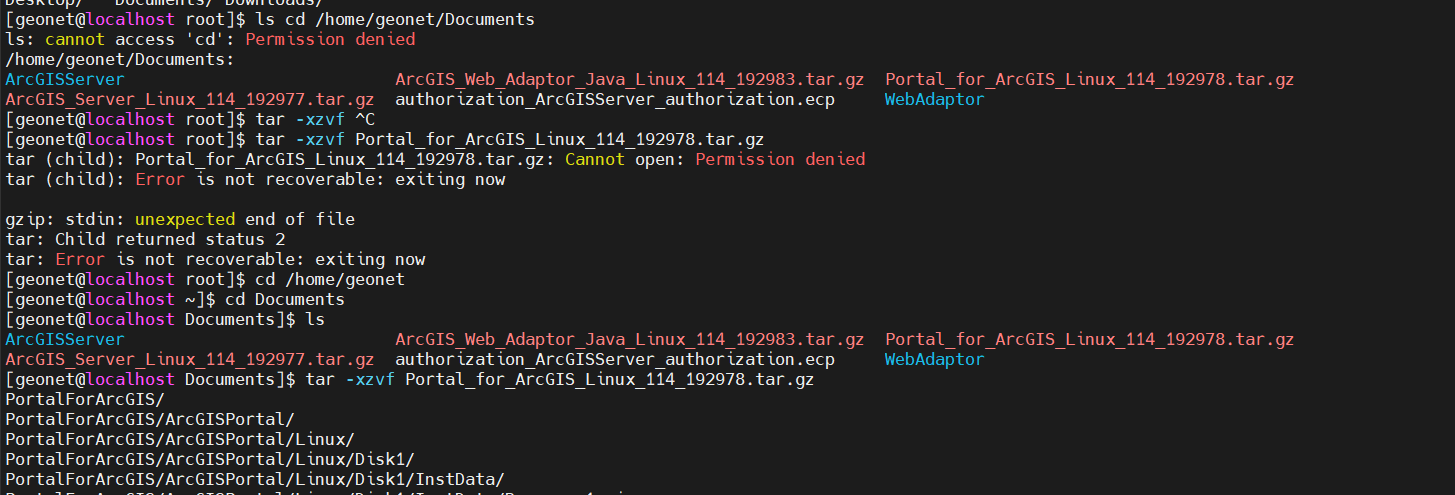
## 2.extract file instalasi Portal_for_ArcGIS. pastikan masuk sebagai user geonet.masuk ke ``/home/geonet/Documents``
masukan command berikut untuk extract
```
tar -xzvf Portal_for_ArcGIS_Linux_114_192978.tar.gz
```
## 3.jika sudah terextract dengan benar pada direktori documents akan ada PortalForArcGIS,``cd PortalForArcGIS`` lalu jalankan ``./Setup.sh`` dan proses instalasi akan berjalan.
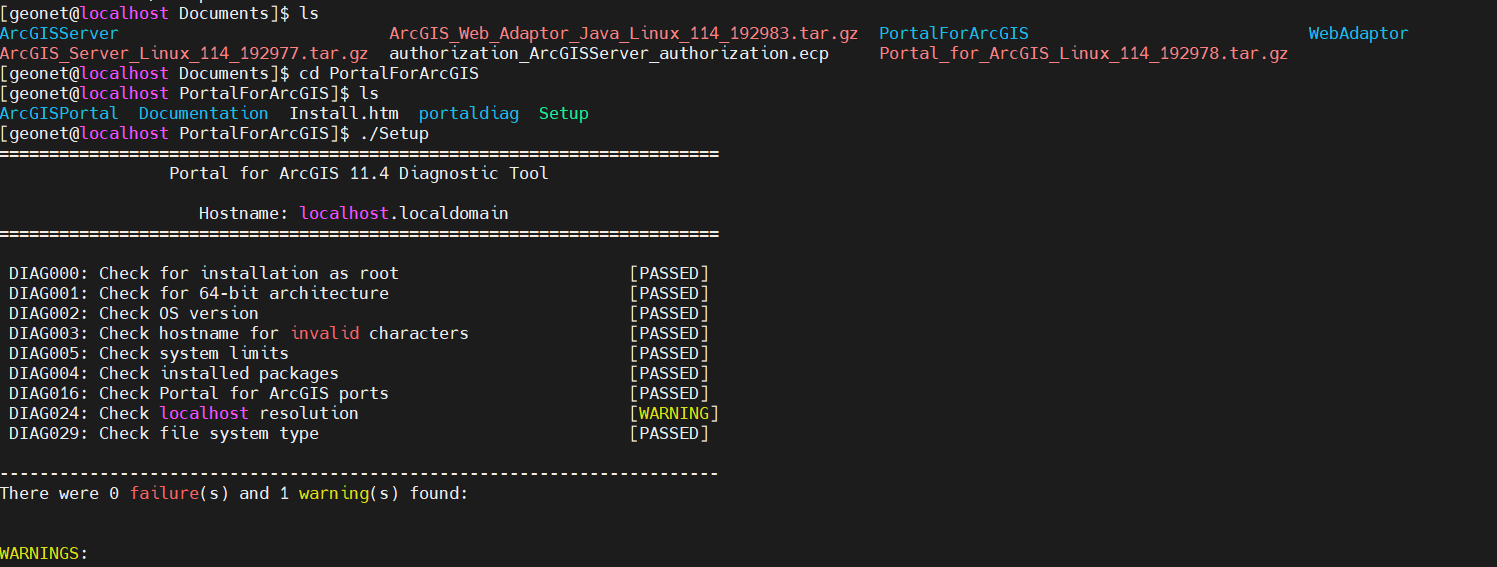
## 4.proses instalasi
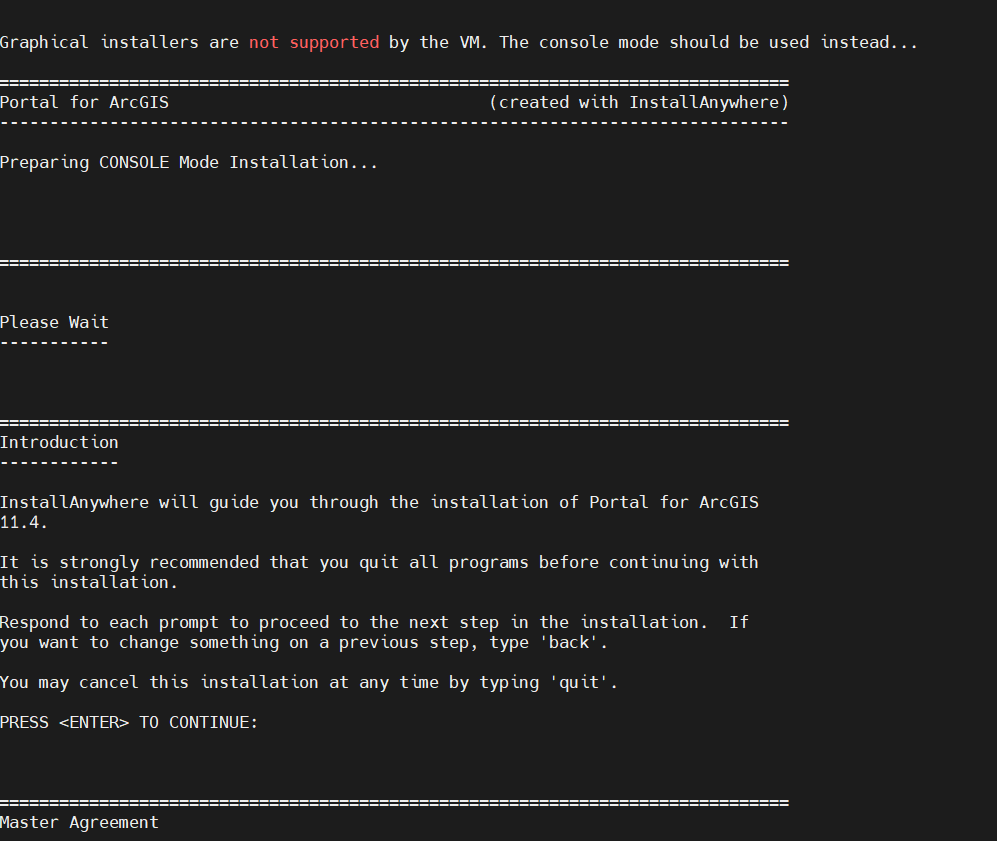
pilih Y untuk menyetujui agreement
pada instalation path bairkan default
instalasi selesai dan kita diarahkan untuk mengakses portal ``https://lcoalhost:7443/arcgis/home`` unutk melakukan config lanjutan
## 5.sebelum membuka portal,ubah dan copy arcgis.war menjadi portal.war.
masuk ke direktori``cd /opt/tomcat/arcgis/webadaptor11.4/java/``
input command
```
sudo cp arcgis.war /opt/tomcat/webapps/portal.war
```
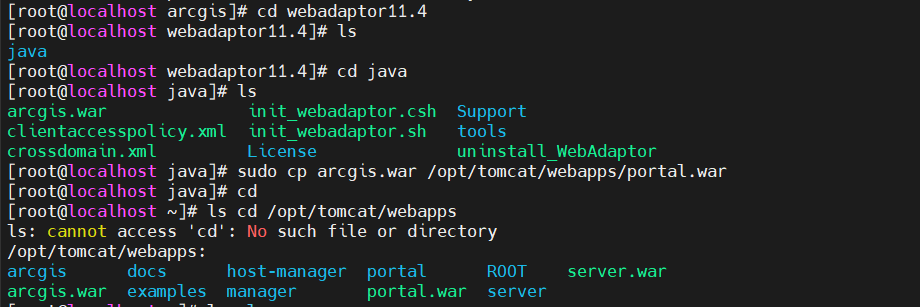
pastikan portal.war sudah ada di ``/opt/tomcat/webapps/``
input command ``` sudo chown -R tomcat:tomcat portal.war``` agar portal.war dapat diekseskusi oleh tomcat
## 6.create new portal
masuk ke ``https://localhost:7443/arcgis/home`` lalu pilih create new portal
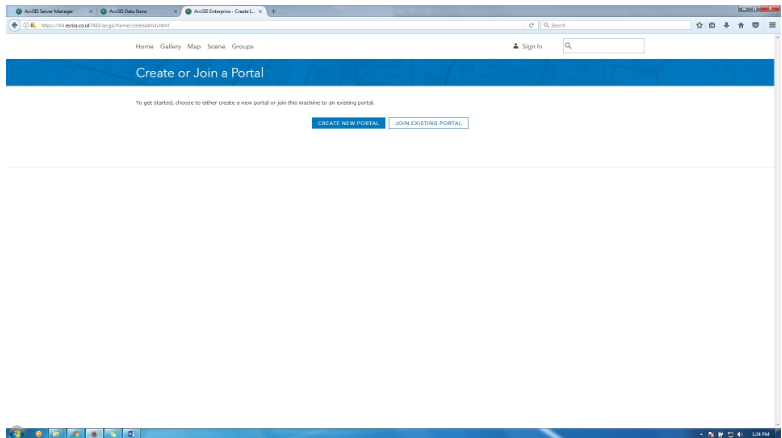
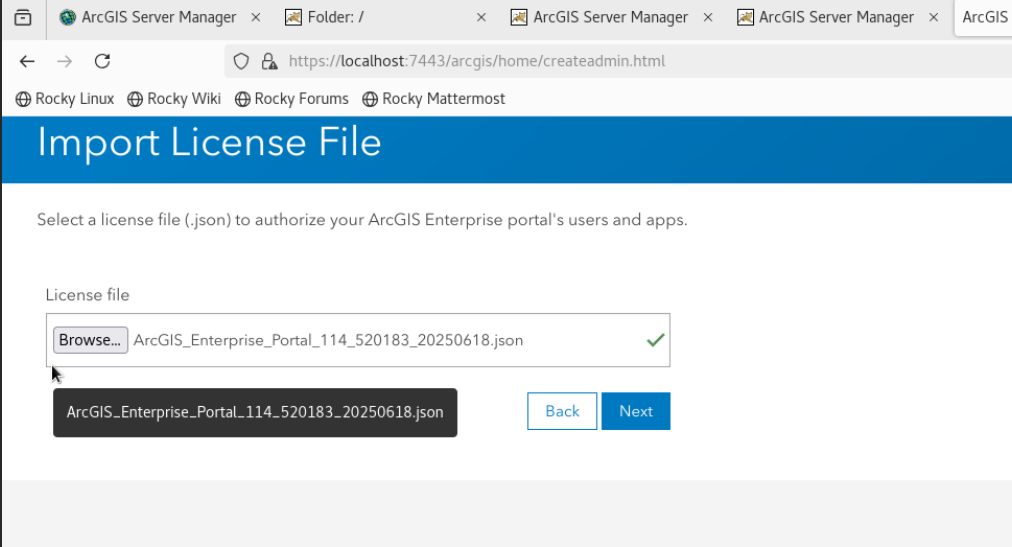
select license.json,pastikan sudah ada file license untuk ArcGIS Portal. file license terdapat di /home/geonet/documents. klik browse dan pilih license yg sudaha ada
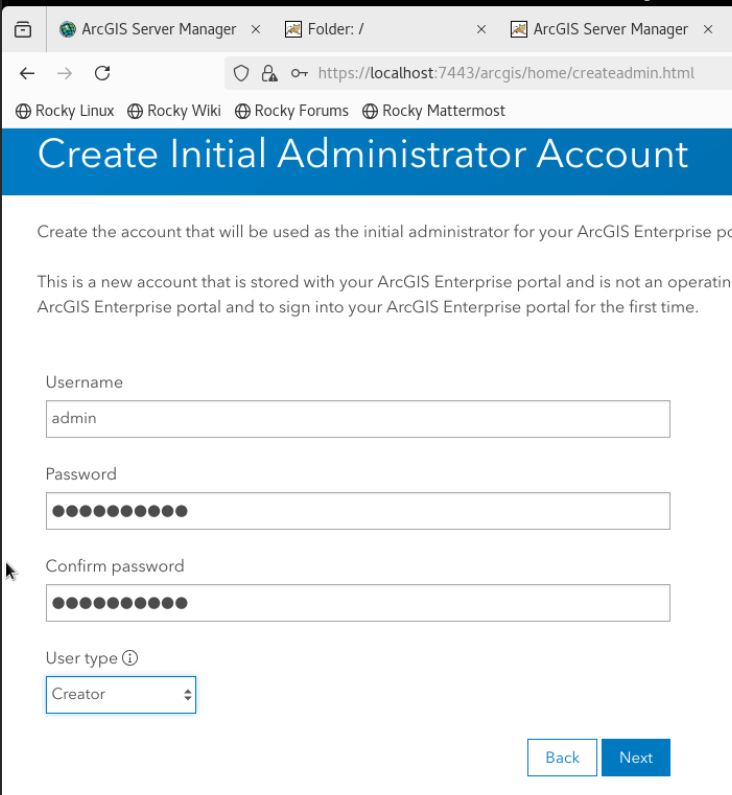
membuat account untuk administrator & additional account

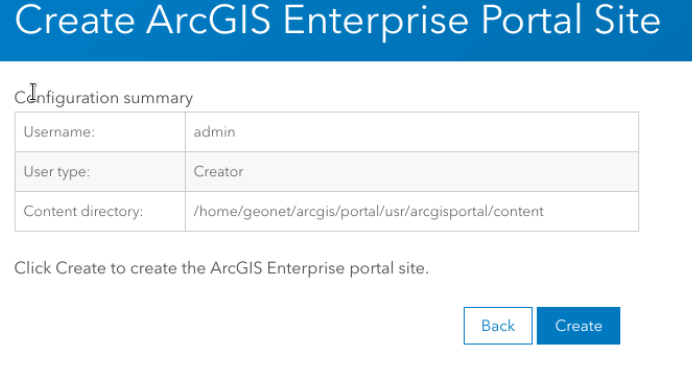
configuration summary,lalu klik create untuk melanjutkan proses create
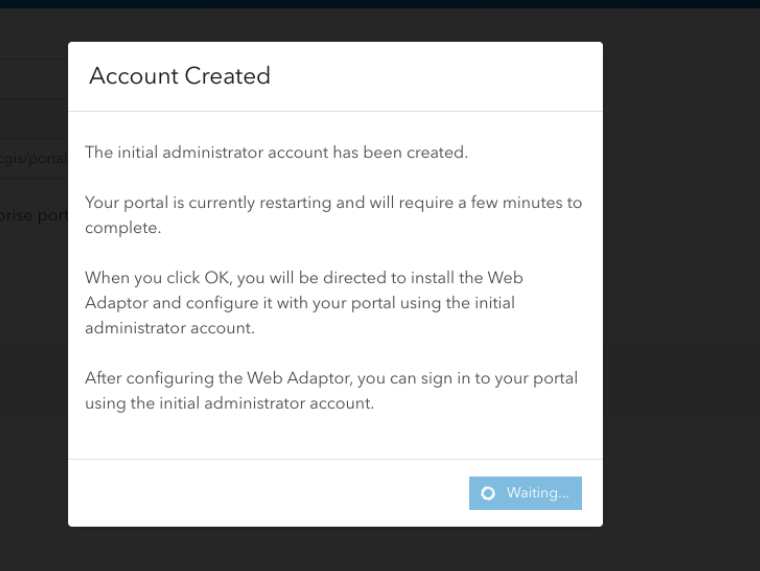
## 8.setup portal for arcgis
setelah account unutk portal berhasil di created masuk ke ``https://localhost/portal/webdaptor/`` pilih portal for arcgis
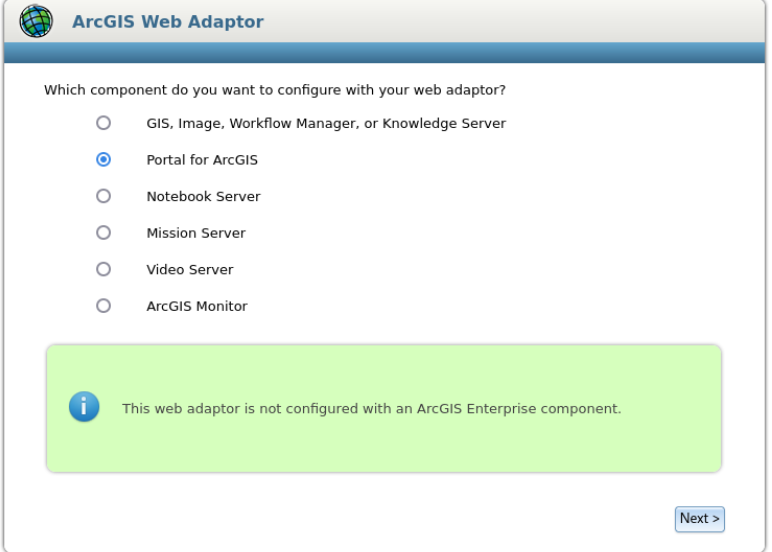
## 9.config portal webadaptor
jika config yang dilakukan banar,portal webadaptor akan terbuka dan akan meminta portal name,admin username dan password
input
```
https://localhost:7443/
```
## 10.config portal webadaptor via command line
config melalui command line dengan``configurewebadaptor.sh`` masuk ke``cd /homne/geonet/arcgis/webadaptor11.4/java/tools``
jalankan perintah ini pada``configurawebadaptor.sh``:
```
./configurewebadaptor.sh -m portal -w https://local.gisportal.id/portal/webadaptor -g https://local.gisportal.id:7443 -u adminportal -p' admin.123' -a true
```
saat terjadi error pada proses configure masuk ke:
```
cd /arcgis/portal/usr/arcgisportal/logs/local/portal
```
kemudian:
```
ls -ltr
```
lihat log file secara real time
```
tail -f portal-20250827.085821-153868-0.0.log
```
dari log file tsb kita bisa melihat error yang terjadi serta perhatikan webadaptor name dan credential.
## 11.tampilan akhir portal
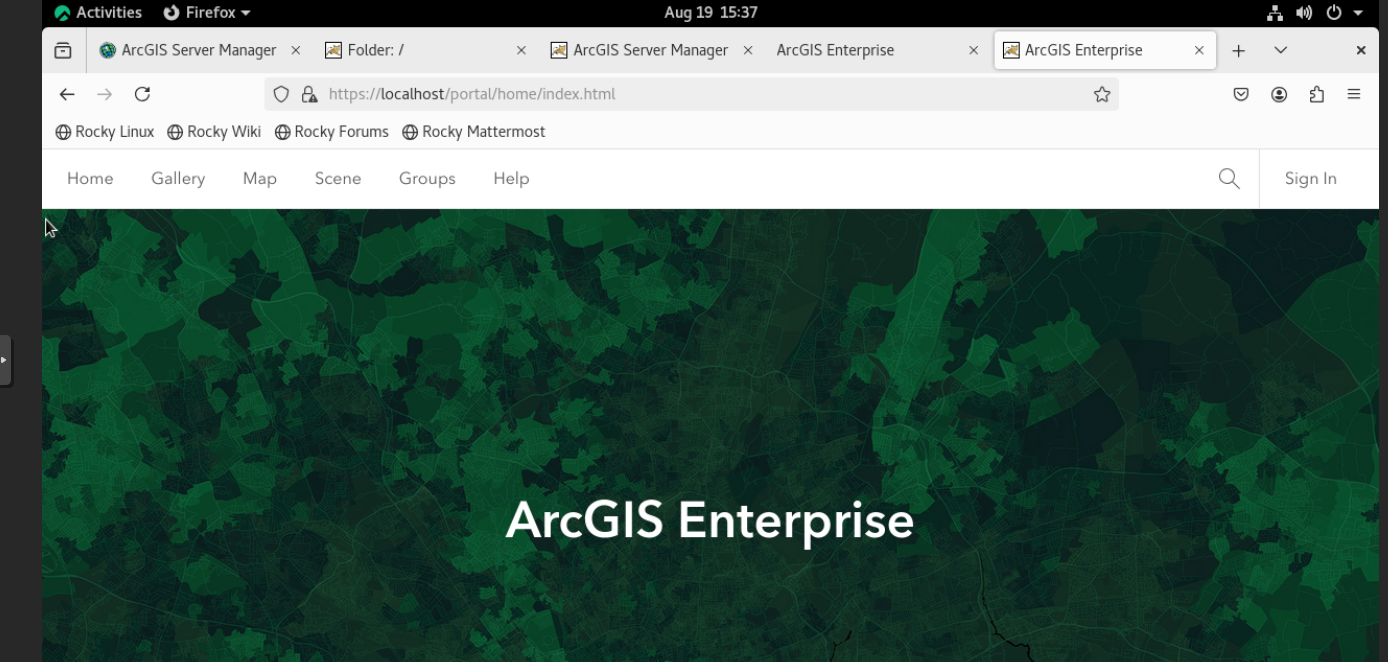
## Post Instalation
### service lifecycle management
masuk ke file instalasi arcgisportal ``cd /home/geonet/arcgis/portal/framework/etc/arcgisportal.service``pastikan ada arcgisportal.service
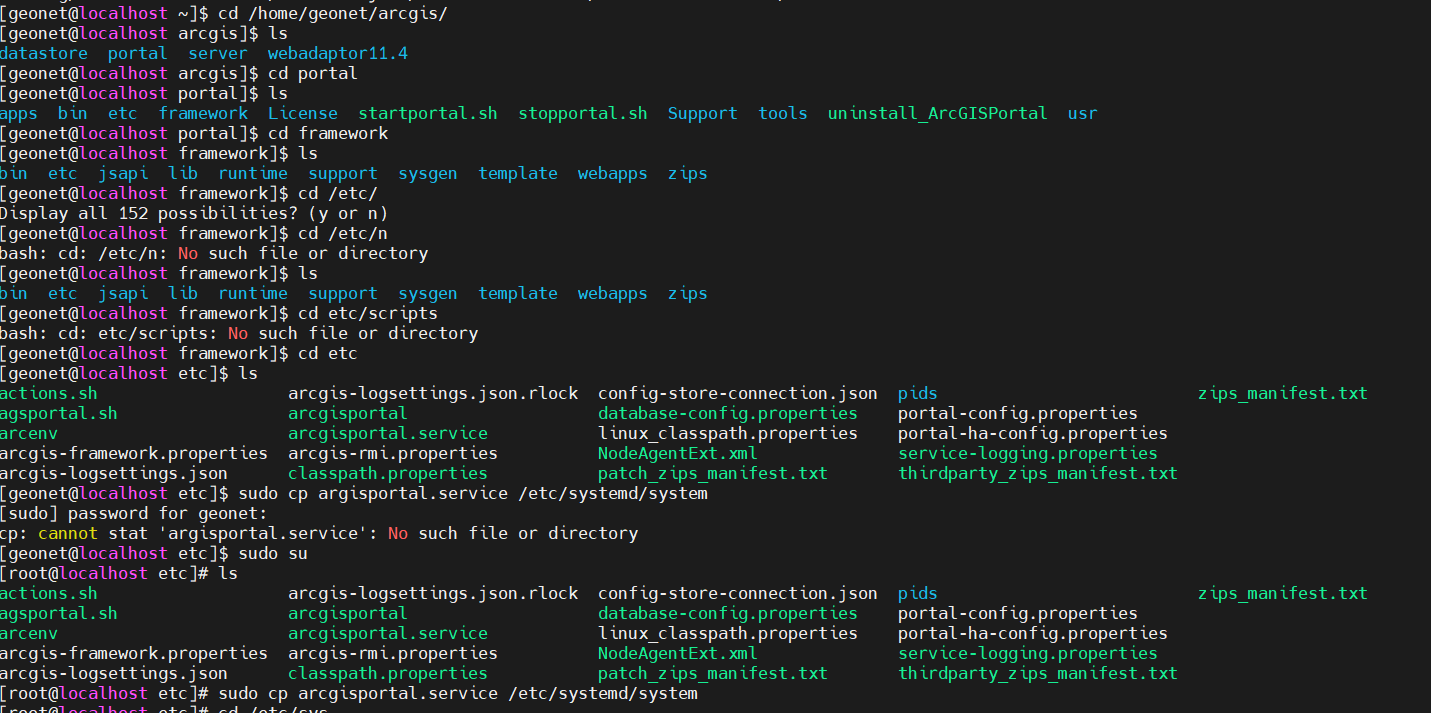
copy file arcgisportal.service ke ``/etc/systemd/system/``
copy command:
```
sudo cp arcgisportal.service /etc/systemd/system/
```
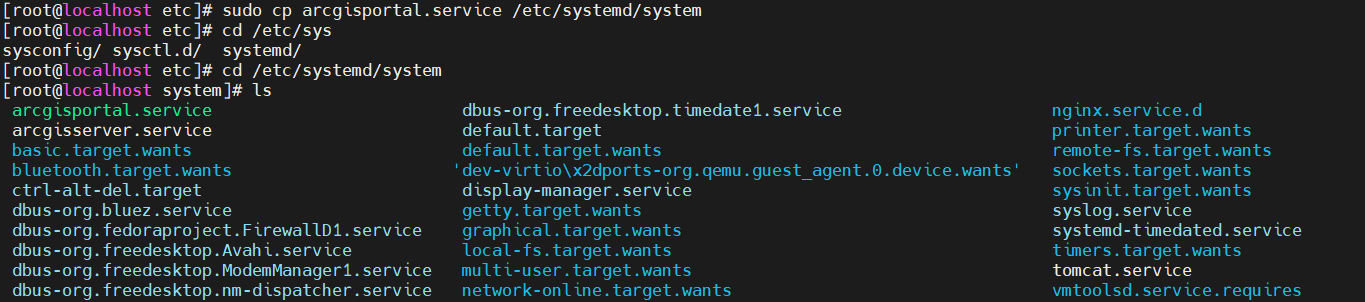
ubah permission arcgisportal.service yang sudah tersimpan pada /etc/systemd/system. pastikan permissionya menjadi rw------- agar dapt dieksekusi
```
chmod 600 arcgisportal.service
```

untuk membuat links otomatis di dalam ``/etc/systemd/system/multi-user.target.wants`` jalankan command di bawah ini:
```
systemctl enable arcgisportal.service
```
Dengan menambahkan /bin/bash di depan perintah, Anda secara eksplisit memberitahu systemd untuk menggunakan interpreter Bash untuk menjalankan skrip Anda. Hal ini penting jika skrip Anda tidak memiliki shebang (#!/bin/bash) atau tidak memiliki izin untuk dijalankan secara langsung (tidak executable).
masuk ke file arcgisportal.service:
```
sudo nano /etc/systemd/system/arcgisportal.service
```
update file seperti berikut:
```
[Unit]
Description=Portal for ArcGIS Service
After=network.target
[Service]
Type=forking
User=geonet
GuessMainPID=false
LimitNOFILE=65535
Restart=on-failure
# To prevent any one service from spawning too many threads and consuming all
# server resources, systemd v228 and beyond included in SLES12 SP2 and higher
# set the maximum number of threads to be created at 512. Users on SLES12 may
# need to enable and raise this limit if it is a heavily used system. Use
# "systemctl show --property DefaultTasksMax" to check the current value. To
# find the version of systemd, use "systemctl --version".
# TasksMax=512
ExecStart=/bin/bash /home/geonet/arcgis/portal/startportal.sh
ExecStop=/bin/bash /home/geonet/arcgis/portal/stopportal.sh
[Install]
WantedBy=multi-user.target
```
Lalu reload daemon dan start ulang servicenya:
```
systemctl daemon-reload

systemctl enable arcgisportal.service
```
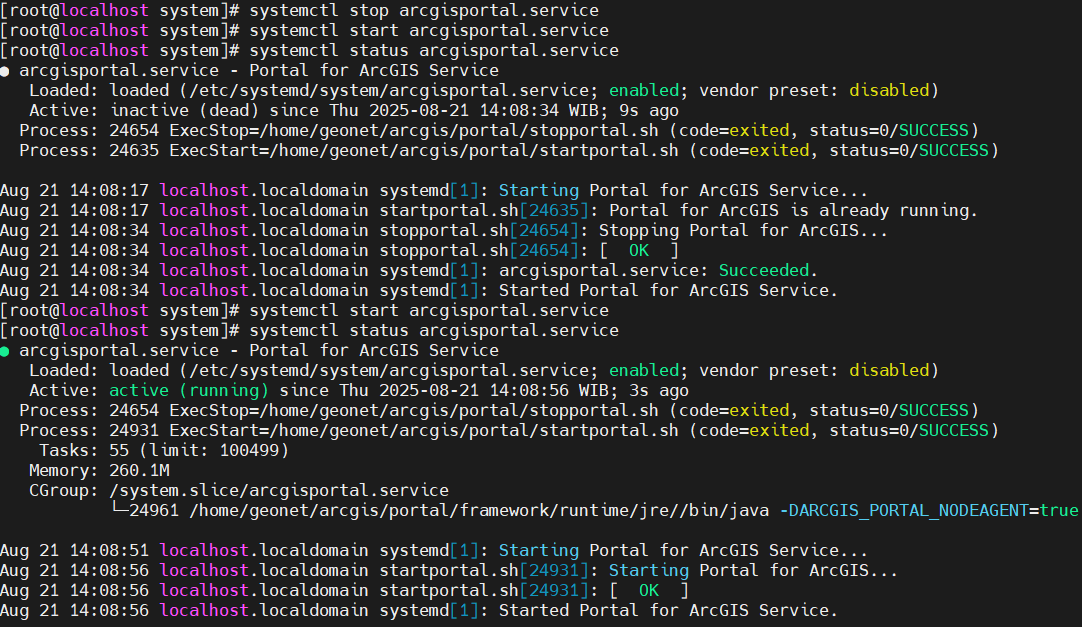
untuk memastikan servide systemd berjalan jalankan command berikut:
```
systemctl stop arcgisportal.service
```
```
systemctl start arcgisportal.service
```
```
systemctl start arcgisportal.service
```
### service management pada arcgis portal berhasil berjalan


Install & Config ArcGIS Portal
1.pastikan file Portal_for_ArcGIS_Linux_114_192978.tar.gz sudah ada di /home/geonet/Documnets
2.extract file instalasi Portal_for_ArcGIS. pastikan masuk sebagai user geonet.masuk ke
/home/geonet/Documentsmasukan command berikut untuk extract
3.jika sudah terextract dengan benar pada direktori documents akan ada PortalForArcGIS,
cd PortalForArcGISlalu jalankan./Setup.shdan proses instalasi akan berjalan.4.proses instalasi
pilih Y untuk menyetujui agreement
pada instalation path bairkan default
instalasi selesai dan kita diarahkan untuk mengakses portal
https://lcoalhost:7443/arcgis/homeunutk melakukan config lanjutan5.sebelum membuka portal,ubah dan copy arcgis.war menjadi portal.war.
masuk ke direktori
cd /opt/tomcat/arcgis/webadaptor11.4/java/input command
pastikan portal.war sudah ada di
/opt/tomcat/webapps/input command
sudo chown -R tomcat:tomcat portal.waragar portal.war dapat diekseskusi oleh tomcat6.create new portal
masuk ke
https://localhost:7443/arcgis/homelalu pilih create new portalselect license.json,pastikan sudah ada file license untuk ArcGIS Portal. file license terdapat di /home/geonet/documents. klik browse dan pilih license yg sudaha ada
membuat account untuk administrator & additional account
configuration summary,lalu klik create untuk melanjutkan proses create
8.setup portal for arcgis
setelah account unutk portal berhasil di created masuk ke
https://localhost/portal/webdaptor/pilih portal for arcgis9.config portal webadaptor
jika config yang dilakukan banar,portal webadaptor akan terbuka dan akan meminta portal name,admin username dan password
input
10.config portal webadaptor via command line
config melalui command line dengan
configurewebadaptor.shmasuk kecd /homne/geonet/arcgis/webadaptor11.4/java/toolsjalankan perintah ini pada
configurawebadaptor.sh:saat terjadi error pada proses configure masuk ke:
kemudian:
lihat log file secara real time
dari log file tsb kita bisa melihat error yang terjadi serta perhatikan webadaptor name dan credential.
11.tampilan akhir portal
Post Instalation
service lifecycle management
masuk ke file instalasi arcgisportal
cd /home/geonet/arcgis/portal/framework/etc/arcgisportal.servicepastikan ada arcgisportal.servicecopy file arcgisportal.service ke
/etc/systemd/system/copy command:
ubah permission arcgisportal.service yang sudah tersimpan pada /etc/systemd/system. pastikan permissionya menjadi rw------- agar dapt dieksekusi
untuk membuat links otomatis di dalam
/etc/systemd/system/multi-user.target.wantsjalankan command di bawah ini:Dengan menambahkan /bin/bash di depan perintah, Anda secara eksplisit memberitahu systemd untuk menggunakan interpreter Bash untuk menjalankan skrip Anda. Hal ini penting jika skrip Anda tidak memiliki shebang (#!/bin/bash) atau tidak memiliki izin untuk dijalankan secara langsung (tidak executable).
masuk ke file arcgisportal.service:
update file seperti berikut:
Lalu reload daemon dan start ulang servicenya:
untuk memastikan servide systemd berjalan jalankan command berikut:
service management pada arcgis portal berhasil berjalan